graph LR
    A(Projects) --> B(project 1) & C(project 2)
    B --> D(Data) & E(Writing) & F(R) & G[README.txt]
    E --> P[manuscript.docx]
    D --> H[dat1.csv] & I[README.txt]
    C --> J(Data) & K(Writing) & L(Python) & M(R) & N(Rmds) & O[README.txt]

classDef file fill:#FFFFFF,stroke:#FFFFFF;
class G,H,I,O,P file
Week 1
Setting up a workflow
Introductions
Instructor: Dusty Gannon
- MS Statistics, OSU
- PhD Botany and Plant Pathology, OSU
Expertise
- Statistics
- Pollination ecology
- Population biology and ecology
- R
- Stan/JAGS
- C++
- LaTeX
- python(ish)
What is R?
- A computing language
- Object oriented (somewhat loosely)
- Objects have classes
- Interpreted language (versus compiled)
- Object oriented (somewhat loosely)
Why R?
- Statistical analysis
- Relatively easy to learn
- Excellent tools for cleaning, formatting, and analyzing tabular data
Setting up your workspace
- Adopt or create a file naming convention. You can create your own, but some general guidelines include:
- ❗ No spaces. Instead use
-or_. E.g.my_file.txt - Dates can be sorted easily using yyyymmdd or yymmdd format. E.g.
20240903_my_file.txt - Here are some more tips: https://datamanagement.hms.harvard.edu/plan-design/file-naming-conventions. Ignore their versioning advice. We will use
gitfor version control.
- ❗ No spaces. Instead use
- Adopt a project organization convention. For example:
Taking project organization to the next level
Collaboration is an important aspect of modern science. How do we work collaboratively on code? Let’s see the importance of some of the tools you will be introduced to with an example.
Absolute vs. relative paths
- Relative paths: Paths to a location that is relative to a specified location, such as the location of the current document or a project directory.
- Absolution paths: Paths to files and locations relative to the root of the file system.
A short aside: Navigating RStudio
- 4 Panes
- Console
- Editor - Where you will edit R scripts and other documents
- Environment - Where you can see objects stored in memory
- Files/Viewer - Where you can navigate the file system and see outputs of plots and other visuals.
- Customizing the appearance (Very important 😉)
- Tools -> Global options -> Appearance
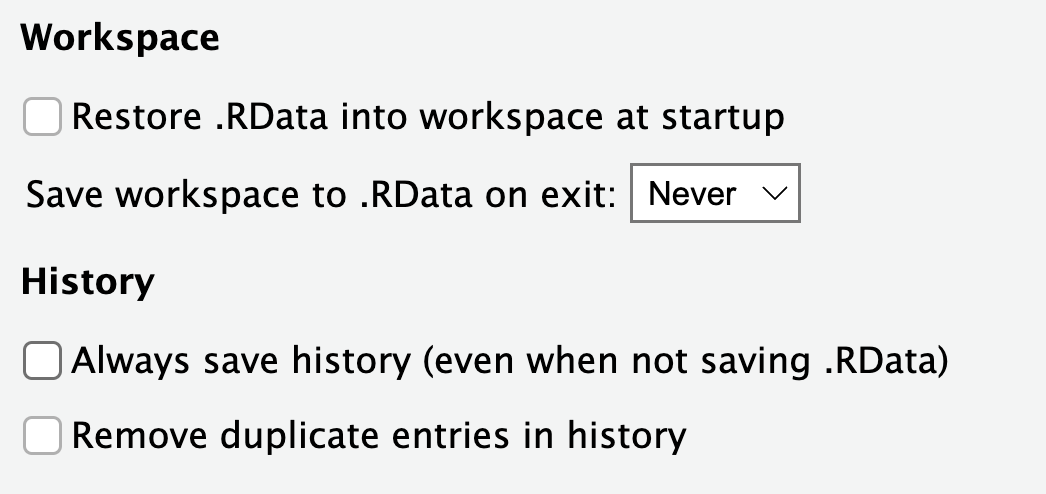
Other important global options
- Tools -> Global options -> General
- In the Workspace and History settings, adjust the defaults to match the image below.
- If working on a Windows machine, change your default terminal to PowerShell or some similar bash-like terminal by going to Tools -> Global Options -> Terminal and change the options that says New terminals open with….
Back to project organization
testing
One of the things that trips people up when they first begin using programming languages to do data analysis is file path management. Good, consistent project organization combined with RProjects can relieve this headache substantially.
A better way
Note
The double-colon syntax, package::function(), as we are using with here::here() is a safer way of using functions from packages downloaded from the internet than loading the full library and then calling the function without prefacing with the package name. We will get into packages more later in the workshop, but for now, remember that we can use any function from a downloaded package using this syntax.
Git and GitHub
Key git vocabulary
Nouns
- repository/repo: Effectively a folder/directory
- remote: The version of the repo that is hosted on GitHub or some other web-based hosting platform
- local: The version of the repo that is stored on your personal computer
- staging area: A list of files that should be “tracked”, or version controlled, using
git. - commit: When used as a noun, a recorded change or set of changes to the repo.
- branch1: A separate record of changes to the repo. There is usually a
mainbranch that serves as the reference and feature branches that can be merged withmainonce the edits to the repo are complete. Branches are useful for collaborative repositories. - pull request2: A set of suggested changes to a repo that can be suggested by a collaborator or, if the repo is public, anyone on the internet. The suggestions can then be reviewed by the owner of the repo and merged or not.
Verbs
- clone: To copy a repo from GitHub that you have admin or collaborator privelages on
- fork: To copy a repo from GitHub (or another host) that you do not have write priveleges to. The only way to contribute to a forked repo is through pull requests.
- pull: To sync changes from the remote to your local repo
- push: To sync changes from your local repo to the remote
- commit: When used as a verb, a set of change for which you want to create a time-stamp/record of the repo at that point in time.
- commit message:
A simple workflow
graph LR
    A[fa:fa-github Initial state] -.-> D[fa:fa-github updated remote]
    A -- clone to local --> B(fa:fa-laptop initial local)
    B -- commit changes --> C(fa:fa-laptop updated local)
    C -- push changes --> D

classDef remote fill:#ececec,stroke:#2d2926,color:#000000;
classDef local fill:#81a9ad,stroke:#2d2926,color:#000000;
class A,D remote
class B,C local
Multiple computers
graph TD
    A[fa:fa-github Initial state] -.-> E
    A -- clone to local 1 --> B(fa:fa-laptop initial local 1)
    A -- clone to local 2 --> C(fa:fa-desktop initial local 2)
    B -- commit changes --> D(fa:fa-laptop update1 to local 1)
    D -- push to remote --> E[fa:fa-github update 1 to remote]
    E -.-> H
    E -- pull to local 2 --> F(fa:fa-desktop update 1 to local 2)
    C -. fast forward .-> F
    F -- commit changes --> G(fa:fa-desktop update 2 local 2)
    G -- push to remote --> H[fa:fa-github update 2 to remote]

classDef remote fill:#ececec,stroke:#2d2926,color:#000000;
classDef local1 fill:#81a9ad,stroke:#2d2926,color:#000000;
classDef local2 fill:#537380,stroke:#2d2926,color:#FFFFFF;
class A,E,H remote
class B,D local1
class C,F,G local2
Using git and GitHub
Let’s get some practice with the git workflow while also introducing how your homeworks will be assigned.
Using git from RStudio
The most common git commands have been baked into the RStudio GUI. These include adding files to the staging area, committing and writing commit messages, pushing, and pulling.
If you are working on a Windows machine, I have found that you often need to specify where your git.exe file is stored and point RStudio to that location. To do so, go to Tools -> Global Options -> Git/SVN, then either browse or supply the filepath to the git executable. For example, for those that downloaded git through GitHub Desktop, the git.exe is located in C:/Users/<username>/AppData/Local/GitHubDesktop/app-<version>/resources/app/git/cmd/git.exe.
Cloning
To clone a repo to your local computer, go to File -> New Project… -> Version Control -> Git.
Next, go to your GitHub repo and click the green “Code” button. Copy the HTTPs URL and paste it into the dialogue box from RStudio. You can then save it to a specific location. This will open the repo as an RProject.
Note
If you set up your ssh keys before the course started (extra credit on homework 0), then be sure to clone your project from GitHub using the ssh protocol, not HTTPs.
Pulling
Except for immediately after the initial cloning step when you are copying the remote repo to your local machine, the first thing you should do upon opening a repo locally is pull. This merges any new edits that are saved on the remote that you don’t have locally. This is easily accomplished in RStudio using the blue down arrow ⬇️ on the Git pane.
Committing
In the upper right panel of RStudio, you will now see a git tab.
- After making changes to files, click the green checkmark ✔️ icon that says “commit” when you hover over it with your mouse. This will bring up a new dialogue box.
- Check the box next to the file you changed and to which you want to commit the changes. You can see the changes made in the panel at the bottom.
- Write a commit message in the box that describes the changes made or the state the project is in. Ideally, you should be able to look at commit messages and use them to revert the project back to previous states if necessary.
- Press “commit”.
Pushing
Once you are ready to merge your local changes with the remote repo, press the green up arrow ⬆️ in the Git pane of RStudio. The remote repo will be updated with the changes you made during the working session.
Using GitHub Desktop
GitHub Desktop gives the user a GUI with which to interact. To clone a repository to your local computer using GitHub Desktop, open GitHub Desktop and sign into your GitHub account.
Cloning a repo
Once signed into GitHub from GitHub Desktop, click Clone a Repository from the Internet.... GitHub Desktop should already be linked to your GitHub account, so you just need to search for the repo you want. Clone the repo to the local location you want using the Choose button to navigate to the local path. Then click Clone.
Pulling
Select the repo you want to work on. In the top-left corner of GitHub Desktop, you will see a drop-down menu. Click this and select the repository you want to pull changes into.
In the top-center of the GitHub Desktop window, check that you are on the correct branch (e.g.,
mainordevelop). You can switch branches using the drop-down menu if needed3.On the toolbar at the top, click the
Fetch originbutton. This will check for any updates or changes made to the repository on GitHub.Once GitHub Desktop checks for updates, the
Fetch originbutton will change toPull originif there are any updates. Click thePull originbutton to download and apply the changes from the remote repository to your local copy.
Committing changes
Once you’ve made changes, open GitHub Desktop. In the Changes tab (on the left panel), you’ll see a list of modified files. Clicking on each file will show a diff view of what was added, deleted, or modified.
At the bottom of the Changes tab, you’ll see a text box labeled
Summary (required). Enter a descriptive commit message that summarizes the changes you made or the state the repo is in. Again, you want to be able to use these messages to revert the repo back to an older version if necessary.- If needed, you can add more details about the changes in the “Description” field, which appears below the summary box. This is helpful for providing more context about the changes.
By default, all modified files are selected for the commit. If you don’t want to commit all the changes, uncheck the files you don’t want to include in this commit.
After filling in the commit message and selecting the files you want to include, click the “Commit to
<branch name>” button (usually labeled “Commit to main” or the name of your active branch). This will commit the changes locally.
Pushing
After committing the local changes, click the Push origin button that appears at the top after committing your changes.
Using git from the command line
A final way to use git is from the command line. This is how git was initially inteded to be used, but GUIs have been developed over time.
Cloning a repo
To clone a repo to your local machine, first, navigate to where you want the repo clone to live.
cd <path-to-clone-location>Then, use the git command clone.
git clone <repo-url>You may be asked to provide pass keys or sign in, which may also happen any time you pull or push. To avoid this, set up SSH keys as described here.
Pulling
Upon opening a repo, it’s a good idea to check for changes made to the remote. To do this, you can use
git fetch origin
git status
which will check for changes and then give you a summary of which files are being tracked, which, have been modified, which are staged, etc. If the local is behind the remote, use
git pullCommitting changes
To commit changes using the command line, you first need to add modified files to the staging area. To do this, use
git add <file_name>or
git add -Ato add all modified files.
Next, commit the modified files using
git commit <file_name> -m "type commit message in quotes after -m flag"or
git commit -am "type commit message here"to commit all changes made to all the staged files using the same message.
Pushing
As you might expect, to push changes up to the remote, you can use
git pushwhich will push all committed changes to GitHub.